After-Sales:
 EN
EN
 AR
AR
 HR
HR
 NL
NL
 FI
FI
 FR
FR
 DE
DE
 EL
EL
 HI
HI
 IT
IT
 PT
PT
 RO
RO
 RU
RU
 ES
ES
 TL
TL
 ID
ID
 SL
SL
 VI
VI
 ET
ET
 MT
MT
 TH
TH
 FA
FA
 AF
AF
 MS
MS
 IS
IS
 MK
MK
 HY
HY
 AZ
AZ
 KA
KA
 UR
UR
 BN
BN
 BS
BS
 KM
KM
 LO
LO
 LA
LA
 MN
MN
 NE
NE
 MY
MY
 UZ
UZ
 KU
KU


News
How to design restaurant kitchen floor plans?
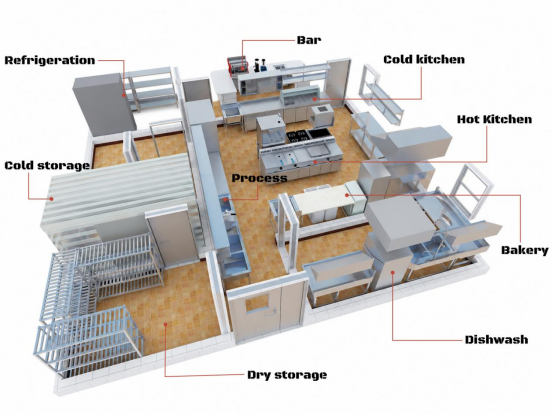
Why Restaurant Kitchen Floor Plans Determine Operational Success
A restaurant kitchen floor plan is not merely a drawing of where appliances go. It is the operational blueprint that determines whether your kitchen runs smoothly during a Friday dinner rush or grinds to a chaotic halt. Every square meter you allocate, every equipment spacing decision you make, and every workflow path you design has a direct impact on food quality, service speed, staff safety, and ultimately your bottom line. This guide walks through the principles, layouts, and practical steps involved in designing a commercial kitchen floor plan that actually works.
Menu-First Design: Let the Food Shape Your Kitchen Floor Plan
The starting point of any restaurant kitchen floor plan is the menu. Not the building, not the budget — the menu. A kitchen built for a pizzeria has fundamentally different spatial needs than one built for a fine-dining French restaurant. The menu determines what equipment you need, which in turn dictates how much space you need and how that space should be organized.
Once you have a finalized menu, the next step is to map out the core zones every commercial kitchen requires: receiving and storage, food preparation, cooking, plating and expo, warewashing, and service. Each zone must flow into the next without staff members crossing paths in ways that create bottlenecks or safety hazards. SHINELONG, which has delivered over 8,000 kitchen projects in more than 150 countries since 2008, begins every engagement with a blueprint consultation phase that maps the client's menu against their available space, ensuring that the layout emerges from operational logic rather than aesthetic preference.
Four Core Commercial Kitchen Layout Archetypes Explained
Among commercial kitchen floor plan layouts, four archetypes dominate. The assembly-line layout arranges equipment in a straight line and is best suited for high-volume, limited-menu operations such as quick-service restaurants and cafeteria-style venues. The island layout places the primary cooking equipment in a central block surrounded by prep stations along the perimeter walls, making it suitable for open kitchens and brigade-style cooking where the head chef needs visibility across all stations.
The zone-style layout divides the kitchen into distinct functional pods — grill zone, sauté zone, pastry zone, cold prep zone — each with its own dedicated equipment, refrigeration, and counter space. This layout excels in full-service restaurants with diverse menus. The galley layout positions equipment along two parallel walls with a central corridor, maximizing space efficiency and is commonly used in narrow urban restaurant spaces. The right layout for a given restaurant depends on its menu complexity, peak covers per hour, kitchen brigade size, and the physical dimensions of the available space. For a client project at the Galaxy Macau Integrated Resort, SHINELONG deployed a hybrid zone-and-island layout that accommodated six cuisine types across interconnected kitchen modules while maintaining seamless service to a 500-seat dining hall.
Space Allocation Ratios: How to Avoid Costly Floor Plan Mistakes
Space allocation ratios are where many first-time restaurant owners make costly errors. A well-designed kitchen typically allocates roughly 40% of total restaurant square footage to the back-of-house operation, though this varies by concept — a fine-dining establishment may allocate up to 50%, while a quick-service restaurant may function comfortably with 30%. Within the kitchen itself, the cooking area should occupy approximately 25-30% of the kitchen footprint, prep areas 20-25%, warewashing 10-15%, storage 15-20%, and service and expo 10-15%.
These are guidelines, not rigid rules, but they provide a sanity check for any floor plan before committing to construction. SHINELONG's design team uses CAD-level precision to model spatial allocation against projected throughput, verifying that the kitchen can handle peak-hour covers without staff congestion. For the 216-room Batam Marriott Hotel Harbour Bay, this modeling ensured that the main kitchen could simultaneously support the all-day dining restaurant, room service, and banquet prep without workflow conflicts.
Equipment Placement Rules for a Functional Kitchen Floor Plan
Equipment placement within the floor plan demands equal rigor. Cooking equipment must be positioned with adequate clearance from walls and from other appliances — typically 150 mm minimum from non-combustible surfaces and 300 mm from combustible surfaces, though local fire codes take precedence. Refrigeration units should be placed as close as possible to the corresponding prep stations to minimize unnecessary movement. The dishwashing area must be positioned at the end of the kitchen workflow, adjacent to the service entrance for clean dish return to the front of house, and separated from food prep zones by a physical barrier or at minimum a 1.5-meter buffer to prevent cross-contamination.
Ventilation hoods must cover all heat-producing equipment and their capture area should extend 150 mm beyond the equipment footprint on all sides. Electrical, gas, water, and drainage connections must be planned at the floor plan stage — retrofitting utilities after equipment installation is one of the most expensive mistakes in commercial kitchen construction. Sourcing precision-engineered heavy-duty appliances from a reliable commercial restaurant equipment manufacturer ensures seamless integration into these utility plans. SHINELONG's 360-degree turnkey service integrates equipment supply with on-site construction, ensuring that utility rough-ins match equipment specifications exactly, eliminating the costly rework that occurs when equipment arrives after walls are closed.
Infrastructure Design: Flooring, Drainage, and Wall Finishes That Matter
Flooring, drainage, and wall finishes may not appear in a conceptual floor plan, but they belong in the construction-level plan. Commercial kitchen floors require quarry tile, epoxy resin, or slip-resistant ceramic tile with a cove base where the floor meets the wall for seamless cleaning. Floor drains must be positioned at low points with a 2% minimum slope toward each drain.
Wall finishes should be smooth, non-porous, and washable — stainless steel or fiberglass-reinforced plastic panels are industry standards. Ceilings require washable, non-absorbent surfaces and should be at least 2.3 meters high, though 2.7 meters or more is strongly preferred in hot kitchens to control ambient temperature. These details are easy to overlook during the floor plan phase but directly impact food safety compliance and day-to-day operational efficiency.
Regulatory Compliance: Building HACCP and Fire Safety Into the Floor Plan
Finally, regulatory compliance must be designed into the floor plan, not bolted on afterward. HACCP principles require distinct physical separation between raw protein handling, vegetable prep, and ready-to-eat food assembly zones. This means your floor plan must show clear traffic patterns that prevent raw-to-cooked cross-contamination. Hand washing sinks must be positioned within arm's reach of every prep and cooking zone — not clustered in one corner of the kitchen.
Fire suppression systems must be specified for all cooking equipment producing grease-laden vapors, and their coverage zones must be mapped on the floor plan before the local fire marshal reviews it. Developers seeking fully certified custom solutions can explore our comprehensive range of commercial hotel kitchen equipment. SHINELONG holds HACCP, FDA, ISO 50001, NSF, CE, and ENERGY STAR certifications, and their design team bakes regulatory compliance into every floor plan from the first draft, drawing on experience from projects across 150 countries where requirements vary significantly by jurisdiction.
Frequently Asked Questions (FAQs)
What is the most efficient restaurant kitchen floor plan layout?
There is no single most efficient layout for all restaurants, but the zone-style layout generally offers the best balance of efficiency and flexibility for full-service restaurants with diverse menus. It creates dedicated functional pods — grill, sauté, pastry, cold prep — each self-contained with its own equipment and refrigeration, which minimizes cross-traffic and allows multiple cooks to work simultaneously without interference. For limited-menu, high-volume operations, the assembly-line layout is typically more efficient because it minimizes movement between sequential steps. The optimal choice depends on your specific menu and peak-hour throughput requirements.
How much space should a restaurant kitchen occupy?
As a general guideline, the back-of-house kitchen should occupy 30-50% of total restaurant square footage, depending on the service concept. Fine-dining restaurants typically allocate 45-50%, casual dining 35-40%, and quick-service operations 25-30%. Within the kitchen, allocate approximately 25-30% to cooking, 20-25% to prep, 10-15% to warewashing, 15-20% to storage, and 10-15% to service and expo. These ratios serve as a starting point and should be adjusted based on the specific menu and operational model.
What are the most expensive mistakes when designing restaurant kitchen floor plans?
The costliest mistakes include: neglecting to coordinate utility rough-ins with equipment specifications before walls are closed; undersizing the ventilation and makeup air system relative to the heat output of installed equipment; placing refrigeration units far from their corresponding prep stations, adding hundreds of unnecessary steps per shift; failing to separate raw and ready-to-eat zones per HACCP standards, which can lead to failed health inspections; and designing for current menu volume without capacity for growth. Each of these errors can cost tens of thousands of dollars to correct post-construction, whereas they cost almost nothing to prevent at the floor plan stage. SHINELONG's integrated design-and-supply model is built specifically to eliminate these disconnects by ensuring that equipment, utilities, and layout are engineered as a single system rather than as separate procurement decisions.